In this post, I will document the specific configuration of the pump and drain system.
Pumping water - Here is a picture of the submersible pump Im using. We werent sure how to connect it, so I tried to take a close enough picture that you can see how its connected. We used a small section of old garden hose and zip ties to connect to the little tube that comes out of the pump. At the top of the section of garden hose is a standard garden hose attachment. I didnt want metal in the tank, so I bought a male hose end at Walmart for about $2 and attached it to the hose section. Its probably more difficult to find this piece in the winter, but you might be able to find one online or at Home Depot or Lowes. There is a female adapter attached to the PVC pipe that allows the hose to be connected to the pipe. We purposely chose to have the little section of hose so there would be some play if we needed to move the pump once it was all hooked up.

Here you can see the pipe coming up from the tank and splitting off to each of the grow beds. The pipe coming up from the tank is 3/4 inch that splits into two 1/2 sections going into the grow bed. Theres a 3/4-inch-to-2x1/2-inch tee at the top of the 3/4-inch pipe. On each side of the tee, I cut a small section of 1/2-inch pipe to connect to one end of the valve. Another section of 1/2-inch pipe on the other side extends over the bed, then an elbow is attached to that section and another section of 1/2-inch pipe goes down into the media in the grow bed. The extra section going into the bed goes a couple of inches into the gravel in order to prevent splashing.
Draining - The water is drained from the grow beds back into the tank using a bell syphon. We followed the instructions in a paper entitled "Construction of Automatic Bell Siphons for Backyard Aquaponic Systems," written at the University of Hawaii. This is an excellent step-by-step document that includes detailed pictures at each step.


The picture on the left is the stand pipe, as described in the University of Hawaii paper. Note the Uniseal fitting at the bottom of the pond. This is what seals the pipe and the pond so there is no leakage. I had a hard time finding this part without having to pay quadruple the cost of the fitting to ship it. However, I found this great online store that not only charged a reasonable price for shipping, but they even had a useful video clip showing how to use the fitting. Bulk Reef Supply sold me the fitting for under $2, and I think shipping for three fittings was under $3. Heres a link to the fitting I purchased, but you might need a different size. Check out the video, though, its pretty cool. The picture in the center is the bell syphon, and the picture on the right shows the syphon in the grow bed with the larger pipe (gravel guard) around it. I also added a piece of screen on top to keep unwanted material or bugs from falling or flying in.
 |
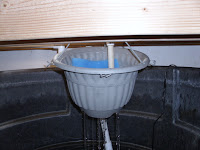
| Drain pipe |
The picutre above is the drain pipe that comes out of the bottom of the grow bed. Note the section of pipe that extends from the lower elbow. Adding a section of pipe, instead of just leaving the elbow by iteself, will reduce the amount of splashing.
I also added a little home made filter to the drain pipe for the first few days, just to try and eliminate any particles that might have made it into the pipe. I dont want anything being sucked into the water pump and clogging it. I actually did have a coupe of pieces of gravel get into it (I think they got sucked in when I shut it off one time) and jam the pump blade. Luckily, I noticed it and shut it off before the motor burned out.
 |
| FIlter |
 |
| Filter |
The pictures above show the filter I made. I just got some filter material and filter carbon from the fish section at PetSmart, put them in the bottom of a planter, and hung it under the drain pipe for a few days.
Timing - A lot of people write that when using a bell syphon configuration, they leave their pump on 24x7. That was my plan, but after listening to my husband gripe about paying 35 cents a day to run it, I decided to put mine on a timer. Also, I think using a timer will prevent possible overflow if the drain gets plugged up or something else unexpected happens. We got a $6 timer that can be "programmed" in half-hour increments. Its not one of the digital programmable timers, but it was cheap, and there isnt a limit on how many events you can program. Well, other than the 48 half hours available in a day.
Also, dont forget to use GFCI connections for anything near your tank!!!! I replaced the old outlet that I was going to use for the water pump and air pump with a GFCI outlet that doesnt require any changes at the circuit breaker box. If you dont feel comfortable doing this, you can buy a plug like this one that plugs into your existing wall outlet and makes it GFCI compliant. This is cheap safety for you and your family and pets!!!
Lessons learned - First, as I mentioned, I think the pump I purchased was too powerful. Thats OK, since Im using the valves to control the flow, but I wonder if that will eventually put too much strain on the pump. Guess Ill find out.
Second, I should have used larger pipes for the drain pipes, stand pipes and bell syphons. When I dont control the flow from the pump, the tubs fill up more quickly than the pipes can drain. This means the syphon never breaks and it could lead to potential overflow in the grow beds.
Thats it for this installment. I hope some of these tips help you in the planning and construction of your system!


